back Sidebar
All sidebar tabs of the video annotation tool explained.
Annotations
The annotations tab shows a list of all annotations in the video, grouped by their label. A click on a label expands the list item to show all annotations that have this label attached. Each annotation is represented by the icon of the shape of the annotation and the user who attached the label to the annotation. A click on an annotation list item selects the annotation. A selected annotation is highlighted both on the image an in the annotations list.

An annotation can have multiple labels by multiple users attached to it. This means that there may be multiple highlighted items in the annotation list for a single selected annotation.
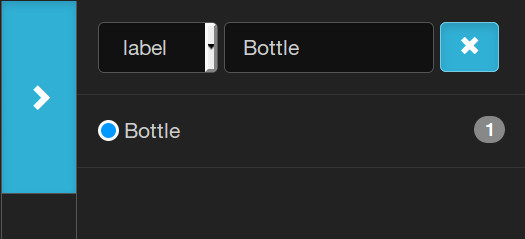
At the very top of the annotations tab there is the annotation filter. Annotations can be filtered by label, user or shape. You can use the filter e.g. to display only your own annotations in the video. Whenever the annotation filter is active, the button of the annotations tab will be highlighted so you don't forget the active filter.
Label Trees
The label trees tab shows all label trees that are available for the video. Here you can find and choose the labels you want to attach to new annotations. Use the search field at the top to quickly find labels of deeply nested label trees. Mark up to ten labels as favorites to quickly select them with the 0-9 keys of your keyboard. To select a label as favorite, click the icon next to the label in the label tree. Now it will appear in the "Favorites" label tree at the top and can be selected with a shortcut key. Click the icon of a favorite label again to remove it from the favorites.
Video Labels
Video labels are labels that are attached to a whole video instead of annotations. Only project editors, experts or admins can modify video labels. To attach a new video label, select a label in the label trees tab (or use a shortcut), then open the video label tab and click the button in the top right corner. To detach a video label, click the button next to it.
Attaching video labels with the video label tab is useful if you need to explore the whole video in order to determine the correct video label. If a video thumbnail is enough (e.g. to sort out bad videos where the camera didn't operate properly) you can attach and detach video labels more quickly in the volume overview.
Settings
The settings tab allows you to customize the video annotation tool and provides some advanced features.
The annotation opacity slider allows you to make video annotations more transparent or hide them completely. Note that this setting will be remembered permanently so don't be confused if no annotations show up the next time you open a video in the video annotation tool.
With the play/pause while drawing value you can configure a time in seconds that the video should automatically play and pause after you have drawn a keyframe of a new annotation. Set the value to 0 to disable the feature.
With the play/pause while viewing slider you can configure a time in seconds that the video playback should automatically pause on each annotation. After the configured time, the video will automatically play again. While the video is paused, a timer is displayed instead of the video play/pause button. Click on the timer or press Space to cancel the timer. Move the settings slider to the far right to enable the "pause" setting, which will pause the video indefinitely on each annotation. This feature can be useful to review single-frame annotations which are otherwise invisible during playback.
The playback rate determines the speed in which the video is played. Set it below 1 to slow the video down or above 1 to speed it up. The default video playback rate is 1.
You can set a jump step value in seconds that allows you to jump backaward and forward in the video by that amount of time with the and control buttons. Set the value to 0 to disable the feature and hide the controls.
The LabelBOT timeout slider allows you to control the time after a LabelBOT popup automatically closes. Move the slider to the left to enable automatic closing.
The minimap switch enables you to show or hide the minimap.
The label tooltip switch controls the display of a tooltip that appears when you hover your cursor over annotations. The tooltip shows the names of the labels that are attached to these annotations.
The mouse position switch controls the display of an additional map overlay that shows the current position of the cursor on the video in pixels.
The thumbnail switch controls the display of a thumbnail preview that appears when you hover your cursor over the video progress bar. The thumbnail shows a preview of the video frame at the hovered time position.
The jump by frame switch allows you to navigate frame by frame (forward and backward) in the video. Note that this is an experimental feature as it is only available in Chrome and may not always give the right frame, so please use it with caution. When the feature is enabled, the and control buttons will appear in the tool bar at the bottom of the video. Use these to jump to the previous/next frame. Also, the keyboard shortcuts are updated.
The mute video switch enables or disables the audio track of the video.
The Single Frame Annotation switch allows you to add annotations with a single click by automatically completing them after the first frame. When enabled, additional controls for finishing and tracking are disabled.
The draft annotation color switch enables using the selected label's color for the pending annotations and current draft annotation sketch. If disabled, a neutral default color is used instead.